Join The Community

Premium WordPress Themes

Tuesday, February 15, 2011

JomSocial 2.0.5


Version 2.0.5
Profile
* BUG: 5130 If user is blocked, they will no longer be able to send private message to the counterpart.
* BUG: 5034 Only accept alphanumeric, dash and dot values for aliases.
* BUG: 5135 Tooltips will no longer display for the inputbox in date fields.
Groups
* BUG: 5061 Group members count are now updated correctly.
* BUG: 5124 Group events are now ordered by starting date.
* BUG: 5027 Comment on public group photos will now be displayed in activity stream correctly.
* BUG: 5091 Create discussion link will no longer be shown if feature is disabled.
* BUG: 5104 Show all groups will now link and display correctly.
* BUG: 5134 All events listing in groups are now sorted by start date.
Events
* BUG: 5090 Added missing create event link in blue face.
* BUG: 5106 Sending email to event participants will no longer be restricted to joomla limit settings.
Messaging
* BUG: 5086 Dates in private messages are now standardized to use Joomla’s default date string.
Photos
* BUG: 5024 Added missing featured albums limit in the back end.
* BUG: 5118 Fixed issues with quotes when executing command in Windows servers.
Apps / Modules
* BUG: 5033 Friend’s location plugin will no longer throw any errors.
* BUG: 5141 Fix events that doesn’t get displayed in the plugin
Misc
* BUG: 5068 Fixed errors with advance search when using multiple conditions.
* BUG: 5119 Itemid will no longer be taken from external URLs
* BUG: 5129 Fixed unnecessary escaping on the strings.
* BUG: 5131 Fixed compatibility issues with the window.
* BUG: 5022 Dates from Facebook will now be parsed correctly.
* BUG: 5079 Fixed links in mutual friends
Patch files (2.0.0/0.1/0.2/0.3/0.4 to 2.0.5)
Jomsocial Pro 2.0.5
JomSocial 1.8 to 2.0 Template Changes for template developers.
Download : http://adf.ly/UU59
Enjoyed!

Sunday, February 13, 2011

PHP Redirect 301 permanently

Sometimes you might want to redirect your visitors to a new URL address. This article will show you how to make a PHP redirect using the 301 "moved permanently" redirection. This is the one you should use as it is the most search engine friendly. Like the name suggests, PHP redirect tells the browser (or a search engine bot) that the page has been permanently moved to a new location.

PHP Redirect Code

To redirect people and robots to a new location use this PHP redirecting code:
<?php
header
("HTTP/1.1 301 Moved Permanently"); header("Location: http://www.New-Website.com"); ?>
Tip: use lower-case name for the header function (not Header) to make sure your PHP redirect code is compatible with PHP 6.

You could skip the 301 Moved Permanently tag and use just:
<?php
header("Location: http://www.New-Website.com"); ?>
But this would result in a "302 Moved Temporarily" redirect instead of a 301 one. This should be avoided as permanent redirects are more search engine friendly and should be used where possible.

You can enter any sub-page for the location, this PHP code will redirect users to the test.php sub-page of your website:
<?php
header
("HTTP/1.1 301 Moved Permanently"); header("Location: http://www.New-Website.com/test.php"); ?>

It is important that you don't have any other code (including empty rows and spaces) before the above PHP redirect code. If you do you will get a nice headers already sent notice from PHP and the redirect will not work.

That's it! Enjoy redirecting PHP pages.

FTP and CHMOD Tutorial

Introduction to FTP and CHMOD

I decided to write this simple FTP and CHMOD tutorial because many people who download my scripts have problems either uploading files or setting correct file permissions (CHMOD) to make the scripts work.
This tutorial doesn't go in detail on what things are and how they work, but rather explains in a simple manner how to transfer files to your server and how to CHMOD them.

FTP program

FTP stands for File Transfer Protocol. Just think of it as a way to transfer files to and from a server. To FTP files to your server you will need your FTP login information (FTP address, username and password) which you should get from your hosting company and a FTP client.
In this tutorial I will use the FileZilla FTP client. FileZilla is a very neat and useful program and best of all - it's FREE. You can use any other FTP client though, they all work in a more or less similar way.
So, go to FileZilla Homepage and download your copy. Windows users make sure you download the .exe file!

Initial Steps

Execute the downloaded exe file and install FileZilla on your computer. The default installation settings are recommended for most users. After installation launch the program.
First of all you need to setup your website. To do that click the Site Manager icon (the very left icon on the toolbar, see Screenshot 1 below) or go to File > Site Manager.
Click on the image to see a larger screenshot
FileZilla interface Screenshot 1: FileZilla interface, mouse pointer on Site Manager button
The "Site Manager" window will open. To add a new site follow these steps:
  1. Click "New site" and type in the website name in the window above the button, for example "my website"
  2. On the right side under "Site details" enter your FTP address (for example ftp.mysite.com) and port. The default port 21 should work on most servers
  3. "FTP" should be selected under "Server type"
  4. "Logontype" must be set to "Normal" so you can type in your username and password below (the ones you got from your hosting company)
  5. If you want to make this your default site check the "Default site" radio button below
Your Site manager should now look something like Screenshot 2:
Click on the image to see a larger screenshot
Site manager Screenshot 2: Site Manager
Now click "Connect" and wait a moment for FileZilla to connect to your server.

We've got connection!

Note the two main windows of the program. The left one is "Local Site" (your computer) and the right one is "Remote Site" (your server). Once you are connected to the server you will see a bunch of folders and possibly some files in the right window. This is the root directory of you website. All your website files and folders should go to your public folder, usually called "public_html", "www" or "html". Open (double-click) your public folder and upload all your website files and folders here.
Click on the image to see a larger screenshot
Connected to FTP server Screenshot 3: Connected to the FTP server
You can create new folders by right-clicking in the "Remote site" window and selecting "Create Directory". For example let's make a new directory called "guestbook". Right-click with your mouse in the "Remote Site" window, select "Create Directory" and type guestbook instead of New Folder, then click "OK" (see Screenshot 4). This directory would open if you typed http://www.mysite.com/guestbook in your browser. Simple, huh? You can always move one directory up by double-clicking the folder icon with two dots, which is always located at the top of directory listings.
Creating new directory Screenshot 4: Creating new directory
Great, now double-click the "guestbook" directory. This is the place where you would for example transfer your GBook files to.
To transfer files to the server double-click each file/folder in your "Local Site" window, or select all files/folders you want to transfer and drag them with your mouse to the "Remote Site" folder (make sure you don't select the icon for moving one directory up though!). You can select multiple files or folders by holding down the Control (Ctrl) key on your keyboard.
FileZilla will start transferring selected files to your server. You will see upload progress in the "Transfer Queue" window which is the bottom window in FileZilla (Screenshot 5).
Click on the image to see a larger screenshot
Transferring files Screenshot 5: Transferring files to the server

ASCII or Binary?

FileZilla will recognize common file types and use the correct transfer mode. If you want to be sure you are transferring files under the correct mode go to menu bar (the top bar in FileZilla, where the "File" and "Edit" buttons are), click Transfer > Transfer type and select either "ASCII" or "Binary". FileZilla will use the selected transfer mode until you change it. Select "Auto" to switch back to auto-detect of file types.

CHMOD

Once all files are uploaded it is time to set correct file permissions, in other words to CHMOD files ("entries.txt" in our example). The readme instructions say this file should be CHMOD-ed to 666. To do that just right-click on the "entries.txt" file (the one on the server, not your computer!) and select "File Attributes" from the menu. In the "Numeric value" filed type 666 and click "OK" (Screenshot 6). That's it! Wasn't that hard, right?
CHMOD Settings Screenshot 6: Setting CHMOD to 666

CHMOD on Windows servers

Not all platforms understand the CHMOD command, Windows servers for example don't support CHMOD. Most Windows hosting plans come with a folder called "cgi-bin" or "cgi" which is pre-configured to allow files being writable by scripts. If you are having trouble installing your scripts on a Windows server (get an "Please CHMOD to 666" error) try installing the script within your "cgi-bin" directory!

Thursday, February 10, 2011

10 Tips for Bloggers

Tips for creating a blog.
There are no hard and fast rules on how to blog. Having said that, bloggers will likely increase their exposure by following some simple blog guidelines.
1.) Stay on topic.
Opinions are generally accepted but the content of the items in the blog should all relate to a general theme. Unless you have an uncanny knack for wit, humor or cynicism, the majority of your readers will be interested in the content that relates to a specific defined theme or loosely defined area of interest. Most readers won't care that you eat Cheerios for breakfast. They may, however, be interested in the fact that vinegar takes out stains and that toilet paper rolls make great wreaths. Define a topic and stick to it. This will ensure that you create a loyal following of interested readers.
2.) Stay informative.
If you are attempting to create the impression that you are knowledgeable about a specific industry or sector, be sure that you stay current on news. If you are endorsing a product or voicing an opinion, be sure to check your facts; your reputation is at stake. If you are offering an opinion, be sure to qualify your post, making it clear that the content is intended as an editorial.
3.) Old news is not news.
While blogging every day can be a drain, it is important that the information presented is current and accurate, writing an article or blurb about something that happened 6 months ago, will not be of interest to many. Telling your audience that Martha Stewart was convicted and will be going to prison, after her sentence is completed will make people question the value of your columns.
4.) Adhere to a schedule.
Create a schedule and stick to it. Realizing that blogging requires time and effort, don't create unrealistic expectations and be unable to deliver. An occasional lapse or holiday is generally understood but readers returning to find stale, out-dated content are going to find another blog with similar content. New blogs and RSS feeds are popping up on a daily basis. If you have worked hard to develop an audience and a community you don't want to lose them due to lack of communication.
5.) Clarity and simplicity.
Keep your posts and blog entries clear and easy to understand. Remember, the web is global and expressions, idioms and acronyms don't always translate. Sometimes a little explanation goes a long way.
6.) Keyword-rich.
If the goal of your blog is to increase your visibility, include related keywords in the title of the blog. Use the title as a headline to attract interest. Each item post should have a title that will attract attention but still be relevant to the post. The title should be no longer than 10-12 words.
7.) Quantity matters.
In order to attract the attention of search engines, you will need to develop content and substance. A headline or simple sentence is not going to generate the interest of readers or help with search engine ranking. Be sure to archive old blog posts to develop a large portal of similarly-themed content.
8.) Frequency.
If your blog content is updated frequently, search engines will tend to spider the pages at regular intervals.
9.) Spell checking and proof-reading.
It only takes a few extra moments and can save you from having to make embarrassing explanations. Remember that whatever you publish on the Internet can be found and archived. Think carefully about what you post before doing so.
10.) RSS.
RSS will increase your blog's reach. It is important that you include your blog's content in an RSS feed to increase readership and distribution.
Most weblog audiences are small, but with time and regular updates audiences grow. Bloggers may never have more than a few hundred readers, but the people who return to regularly are generally interested in what you have to say.
About the Author:
Sharon Housley manages marketing for FeedForAll http://www.feedforall.com software for creating, editing and publishing RSS feeds and NotePage http://www.notepage.net a wireless text messaging software.

Wednesday, February 9, 2011

Understanding Domain and Hosting

In the world of website or blog, certainly you often hear the term of domain or hosting. Domain and hosting are the essential things for a website or blog. Therefore, let’s know and understand what domain and hosting are. For those of you who are not familiar yet with domain and hosting, below is the discussion that Kang Rohman can deliver to you.

  • Domain
In creating a website or blog, you are obligated to have the domain. What is domain?
Maybe you have ever heard about this term in other fields such as math or others. If we observe the general definition, domain means a place or the territory. It will be the same as in the internet; you need to have a place for your website or blog. To differ from one domain with another domain, the domain should be given a name, or we call it the domain name, e.g. http://kangrohman.com, http://berandaku.com, http://blogspottutorial.com, etc. In the popular term, the domain name refers to Domain.
The Domain name is various according to the goal of a website created. The types of domain are specified with the words after it such as:

  • .com  ( read: dot com ) : for commercial website
  • .org  : for organization website
  • .info : for website contains information
  • .biz : for business website
  • .gov: for government’s website
  • etc
There are also domains tend to territory:

  • .us : for website in the United States (US)
  • .co.id ( read : dot co dot id ) : for website in Indonesia
  • .cn : for website in China
  • .co.il : for website in Israel
  • .my : for website in Malaysia
  • etc
However, in the practical, the domain names are no longer for the specified identities, for instance, the domain name ends with .org, used for personal website not for an organization, domain name ends with .info, used for commercial, and so on.
To purchase the domain, you can buy it at the websites that sell domain. This purchase is not permanent, but for a period in years (usually, the price will be for one year). Or precisely, we hire the domain, not buy. But it is more popular to buy a domain not hire a domain.
In the domain, there’s something called Sub Domain (part of domain). The Sub-domain is created of the main domain. The Sub domain can be identified from a separate written by dot (point). For instance, the main domain is kangrohman.com, we can create the sub-domain as blog.kangrohman.com, tool.kangrohman.com, nangkring.kangrohman.com. Or the real example for you is like kolom-tutorial.blogspot.com. Main domain is blogspot.com and the sub domain is kolom-tutorial.

  • Hosting
If you have bough a domain and you access the domain, it will be a blank page. In order to fill out the domain, we will need a hosting to store the database, web machine, etc.
An easy illustration, domain is like a computer and hosting is like the electricity. Both are to support each other. Or another example, the laptop with its battery. So, a website should have the domain name and hosting so it can be accessed by public.
To create a webhosting, you will need the very expensive tools, therefore, a webhosting company are present to give the space or bandwidth. You can find many webhosting companies on the internet.
Hiring a webhosting is usually fixed to 3 months, 6 months, 1 year, 2 years, etc. One webhosting is certainly different from another one.
That’s all today’s post. Next posts, I’ll try to discuss about how to buy a domain, select domain name, select the right hosting, etc.
If there’s a mistake in writing and explaining about domain and hosting, please correct. Thanks.

Add Google Talk to Blog

google talk
I'm sure you are surely knew what is the Google Talk, with Google talk you can send instant messages, make voice calls, leave voice mail messages, transfer files and etc, however of course must with other Google user. Do you know, now you can add Google talk to your blog? not yet known its way? please follow the steps following :


  1. Login to blogger with your ID.
  2. After entering the dashboard page , click Layout. Please saw the picture :
  3. layout
  4. Click at Page Element tab. See the picture below :
  5. page element
  6. Click at Add a Page element.
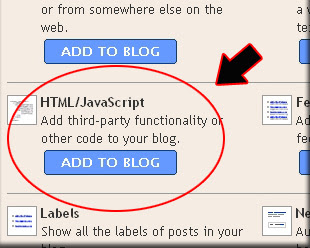
  7. After emerging pop up window , Click add to blog button for the things HTML/JavaScript. See the picture following :
  8. javascript
  9. Copy and paste the code below into available column :
  10. Click   save changes   
  11. Finish. Please see the result.

Now you have a Google Talk at your blog. Or maybe you still confused with the step above? don't worry i have an easy way to do it, just click the button below, login to your blog and the widget will be add to your blog automatically:


See you next time at my new post brother.

Tutorial in creating blog in Blogspot

1. What is Blog?

Blog is short for "Web log", which is a a web application containing note or writing that are usually called "post" and displaying on the web pages. The posts are often displayed orderly based on the age or based on the time when the writing is written and published, so when you view a blog, you will first find the latest posts, top to bottom of the web page and the first to the last page, if the blog has had more than one web page.
For the first time, blog was created as the online private notes, but along with its development and popularity, blog has various types of contents or writings such as tutorial (e.g. this blog), sharing, business, etc. In general, blogs seem not to have the difference with the sites on the Internet.
The blog platform or used to be called blog machine has been created in such a way by blog designers or developers in order to be user friendly, so the knowledge of HTML, PHP, CSS, etc that was a must to create a web application, now with blog, everything is so easy as 1, 2, 3.

2. How to create blog in blogspot

One of the free blog providers that is quite popular today is blogspot or blogger, where you have to register through blogger.com and you get the domain name as sub domain of blogspot, e.g. yourname.blogspot.com.
Why should you create blog in blogger.com, not in other free blog providers? Actually, there is no “should”, but blogger.com has more advantages than other providers do. One of the advantages is the easiness in operating so that blogger.com is good for the beginners. Other advantages are the freedom in editing and replacing the templates to make the best display, custom domain which means that you can replace the domain with your own but with the blogspot hosting, e.g. yourname.blogspot.com can be changed into yourname.com, but still in the same hosting, i.e. the free blogspot hosting.
It should be emphasized from the beginning that the Internet is highly dynamic, so it is very possible that this practical guide to create blog in blogspot will not be relevant anymore as changes occurring, whether to the platform, coding, or anything else that you see right now in blogger.com
To reduce something unneeded to write, below is how to create blog in blogger.com.

Creating Email

One of the conditions required in creating blog is to have an active email address. If you do not have an email, please register at gmail. Since Blogger is one of Google services, when you want to register at Blogger, you had better use Google Email or gmail. If you need a simple guide to create an email, please use Google search engine to search for the best guide.

Sign up for a blog at blogger 

  1. Please visit http://www.blogger.com
  2. After registration page open, go to the right bottom of the page where you can change the language to your own to make you easier to understand the instructions, but in this tutorial, I use English for more global targeting. Please login by using your username and password of your gmail (your email account is allowed to use for login to blogger). login t -blogger
  3. Click "CREATE A BLOG" button
  4. Enter your Blog Title in the field next to "Blog Title", and your expected blog address in the field next to “Blog address (URL). Need to remember that when you enter your expected blog address, you have to be sure of it as you cannot replace it in the future, except you use Custom Domain facility. Check for the availability. If your expected blog address is not available, replace with your new one and so on until you get it. Then type the character you see next to "Word verification", below blog address point and click CONTINUE for the next steps. name-your-blog
  5. Choose a starter template, meaning that you can replace this template in the future and then click CONTINUEchoose a starter template
  6. You will see "Your Blog has been created!" meaning that now you have a blog and you are ready to start Blogging, by clicking "START BLOGGING".  start blogging
  7. You will soon be in the post editor, where you can write anything as you may have thought about before. (it is recommended to directly write for your first post to avoid "Blogger Anti-Spam Robot" that can result in your blog locked. For instance, you can write a very short entry if you have not prepared an entry: "Hello World!", and anything else you want. Click "PREVIEW" button to view how your post will be displayed, then click "PUBLISH POST" if you want your entry to be published. post-editor
  8. Click "View Post" to see your blog. Below is the example of the blog display created
  9. Done
For the first phase, your blog is ready and accessible for public. For next discussions about blogging in blogger are to come.